![[Poster] The Engineering Design Cycle](https://info.variquest.com/hubfs/images/eContent%20Screenshots/engineering%20design%20cycle%20poster%20thumb.png)

 We talk a lot about STEM, or practicing curriculum within its relation to Science, Technology, Engineering, and Mathematics, so today let's amplify the E for Engineering, as it relates to projects across all subject matter where students design, build, and test a solution to a problem.
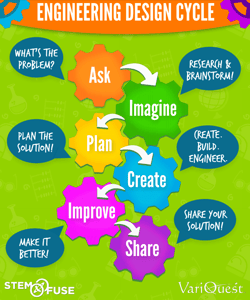
The Engineering Design Cycle encourages students' critical thinking, and learning by failing or doing, which is increasingly how the working world is progressing towards innovation. Divide your students into groups, give them a problem to solve, and have them complete the 6 steps of the Engineering Design Cycle, illustrated in this great poster created in partnership with STEM Fuse, for your classroom or makerspace!

1. Ask: What's the problem? Have students answer questions about a problem you present to them. Be sure to set clear guidelines and give as much detail as possible on what is allowed to solve it. Their questions might include:
- What need are we trying to fill?
- Who will it be for?
- What is required and what are our limitations?
2. Imagine: Research & brainstorm. Have your students research what solutions already exist, and how they could improve upon them. No matter how crazy the ideas, encourage making a list of everything the team comes up with. There might be nuggets of realistic ideas even when shooting for the moon! Ensure they fully understand the situation and its environment and nuances.
3. Plan: Plan the solution! Have the groups step back and review what they learned in the previous two steps, and compare ideas from the brainstorming sessions to eliminate those that aren't going to work. Then, give them a time limit to narrow down to one solution, and develop a plan to execute!
4. Create: Create - Build - Engineer. Now it's time to allow students to put their plans into action by collecting needed materials and tools to build a first, second, and maybe even third draft of the solution until it's just right! Ask them to compare the creation(s) with the problem's original objectives and limitations and encourage them to strive for innovation in their designs!
5. Improve: Make it better! Now's the time to test it out! Does it work? What improvements could be made? Have the groups gather data from their testing outcomes and compare feedback before polishing off the final product.
6. Share: Share your solution! Once each group is happy with their best possible solution, have them develop materials to present what they've learned, how their process progressed, and demonstrate how the solution works to the rest of the class. Allow them to be as creative as possible in their presentation - potentially involving display boards, photos, videos, or 3D models!
This process allows your students to successfully hone in on their teamwork and critical thinking skills to collectively find solutions for problems in the world around them - relating academic work to real-life. You can utilize these steps throughout many subject areas, and the possibilities for problem-solving are endless. Tweet @variquest to let us know how you've used it in your classroom!
For more information on how the VariQuest suite can support STEM learning in your school, including valuable additions to your makerspace, contact us today for a no-obligation demonstration!
